Translate

Friday, July 29, 2022

How to Import Data (tables) from Postgresql to MS Access Database using ODBC : Step by Step Tutorial

 Import Data (tables) from Postgresql to MS Access Database using ODBC : Step by Step Tutorial for data migration from one Database System to Another Database System.

Objective :- Transfer data tables form PostgresSQL database to MS Access Database.

Step1:- Create a Blank MS Access Database in your Windows system.

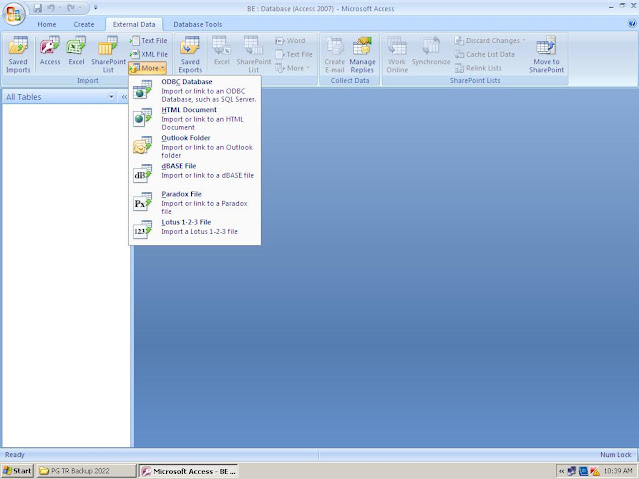
Step2:- Open that newly created Access database and go  the External Data tab. Next Click on the More button. Where you will find lots of options. Select the ODBC_databse form that list.


Import to ODBC Database

Step 2: Select the source and destination of data. Select the option "Import the Source Data into a new table in the current database", and click OK.


Step 2 : import the source data

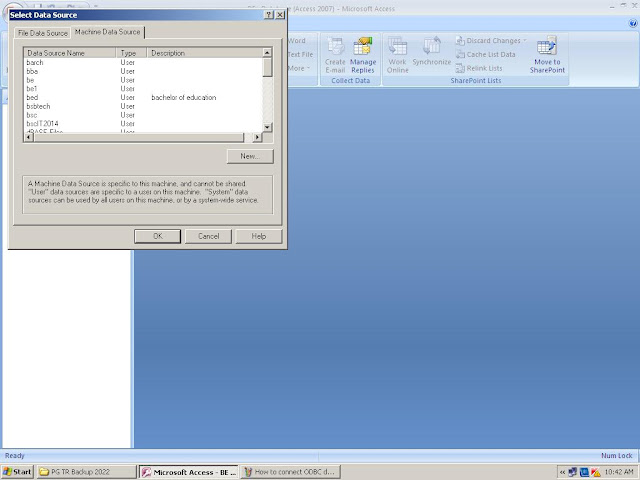
Step3: A new Popup window will appear on the screen. Click on the "Machine Data Source" tab. Here you will see the all DNS , data source names . We will select for example "BE" data source name and click OK.


Step 3 , Select Data Source Name


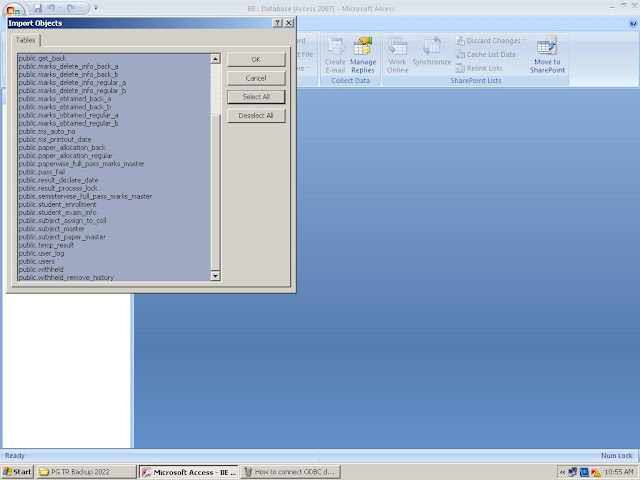
Step 4: Import Objects. In this step you will find all the tables under the BE database. Click on the SELECT ALL button to select all the tables then Press the OK.


Import Object Tables

 Step5: Get External Data- ODBC database.All objects are imported successfully. Press the button SAVE IMPORT.

Get External ODBC Data

Step 7: Your data has been successfully imported form the PostgreSQL database server to your local Windows PC's Microsoft Access Database. Enjoy !!
Successfully imported database form PostgreSQl to Local Access Database


Monday, July 25, 2022

Working Principles of the Layer 2 switch & Layer 3 switch | Network Administration

 Working Principles of the Layer 2 switch & Layer 3 manage switch  | Network Administration.

  • Switches are Layer 2 device,
  • Routers are Layer 3 device
  • The new generation of Layer 3 switches route using hardware only.
  • A switch will examine the incoming frame's MAC header to determine the physical address of the destination device.
  • Whereas a HUB , simply repeats an incoming frame out of all its ports, the switch creates a virtual path to forward frames to the port. Where it knows the destination device exist.
  • Switch can provide flow control to network traffic by temporarily storing frames in a buffer. 
  • Switch can also generate BACK PRESSURE to cause transmitting device to wait long enough for the switch to deal with backlogged traffic. To create back pressure, the switch broadcast false collation detection signals to cause network interface card to back off.
 
Layer 3 managed Switch


Orange { HRM } Human Resource Management Open Source Software installation Process

 Orange HRM Software Installation Process in Your Local Windows PC

Step 1: Download the OrangeHRM for Windows.

Step 2: Install xampp server for windows. {apache, mysql}

Step 3: Now unzip the downloaded software.

A. You will find orangehrm x.x folder.

B. Copy this folder to the C:\xampp\htdocs

C. In your browser, type localhost/orangehrm-x.x

D. A configuration web based window will appear.

Orange HRM


Step 4: Database configuration

Database to Use       | New Database|

Database host name |localhost         |

Database host port   | 3306             |

Database Name        | orangehrm_mysql |

Privileged DB user Name  | root      |

Privileged DB password    | root123 |

Use the same DB user for Orange HRM .Yes

OrangeHRM DB username |orangehrm|

OrangeHRM DB userpassword |orange 123|

Enable database encryption .Yes

NB:- In our configuration we did not give any Root Password for my SQL database. So leave the Privilege DB password file as blank.


Step 5: System Check

Step 6: Admin User Creation

Orange HRM Admin ID | Admin |

Orange HRM Admin Password |Admin1234|

Step 7: Press Next

Step 8: Installing ..........

Step 9: Next

Step 10. Registration ? , No Thanks...