Translate

Showing posts with label configuration. Show all posts

Monday, July 25, 2022

Orange { HRM } Human Resource Management Open Source Software installation Process

 Orange HRM Software Installation Process in Your Local Windows PC

Step 1: Download the OrangeHRM for Windows.

Step 2: Install xampp server for windows. {apache, mysql}

Step 3: Now unzip the downloaded software.

A. You will find orangehrm x.x folder.

B. Copy this folder to the C:\xampp\htdocs

C. In your browser, type localhost/orangehrm-x.x

D. A configuration web based window will appear.

Orange HRM


Step 4: Database configuration

Database to Use       | New Database|

Database host name |localhost         |

Database host port   | 3306             |

Database Name        | orangehrm_mysql |

Privileged DB user Name  | root      |

Privileged DB password    | root123 |

Use the same DB user for Orange HRM .Yes

OrangeHRM DB username |orangehrm|

OrangeHRM DB userpassword |orange 123|

Enable database encryption .Yes

NB:- In our configuration we did not give any Root Password for my SQL database. So leave the Privilege DB password file as blank.


Step 5: System Check

Step 6: Admin User Creation

Orange HRM Admin ID | Admin |

Orange HRM Admin Password |Admin1234|

Step 7: Press Next

Step 8: Installing ..........

Step 9: Next

Step 10. Registration ? , No Thanks...


Saturday, July 23, 2022

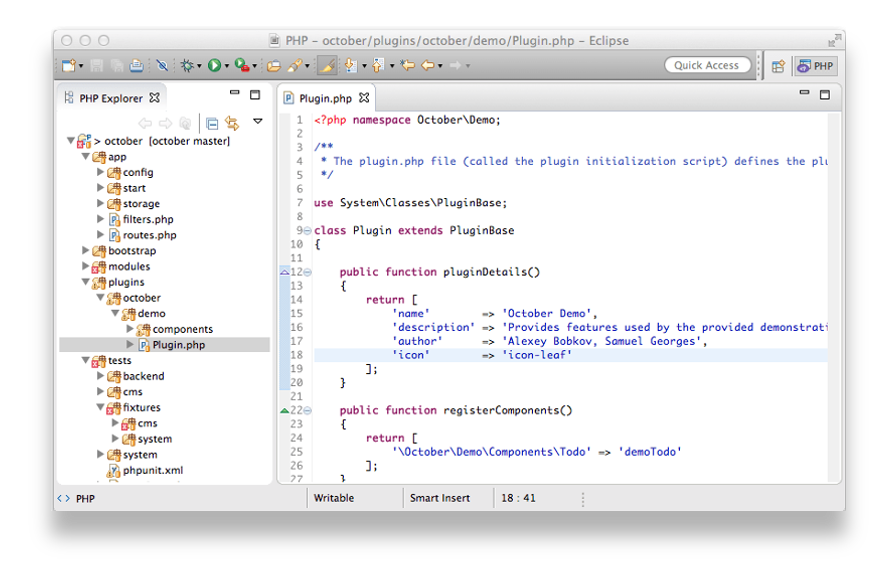
How to install Eclips PHP IDE software in Windows System for Software Development

 Q. How to install Eclips PHP software in Windows System ?

Ans: 

Step 1: Download the Eclips PHP. (www.eclips.org)

Step 2: Unzipe the folder and copy the folder to the appropriate drive.

Step 3: Rename of eclips-php.

Step 4: Make a short cut to Desktop.

Step 5: Click on the setup icon and it will automatically installed the software for you.

Step 6: Next, when you first Run the eclips, then it will ask you to give the work space path.

Step 7: That Path should be "xampp / htdoc " folder. Otherwise it will not display in browser.

Note: Before install PHP, Download the xampp software  and install it in your Windows System.


NB:- An integrated development environment (IDE) is software for building applications that combines common developer tools into a single graphical user interface (GUI).


How to create user DSN with ODBC driver in Windows System for PostgresSQL Database

 How to create user DSN with ODBC driver in Windows System : Step by Step Tutorial Guide :


Step 1: Go to Windows start button -->Click Settings --->Click on Control Panel

Step 2: In control panel go to the Administrative Tools

Step 3: Double Click on the Data Source(ODBC) icon. A small popup screen with lots of tabs will be appear on the screen.

DSN Data Source Name in Windows

Step 4: Click on the User DSN tab.

Step 5: Now click on the ADD button. Now you can see lots of ODBC drivers in the List. Select the appropriate Driver form the List, for example here we chose the PostgresSQL ODBC driver.

Step 6: Click on the Finish button.

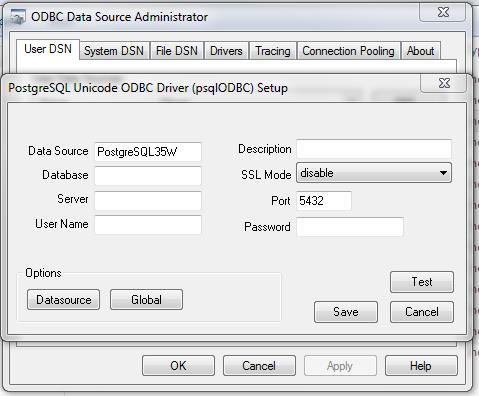
ODBC PostgresSQL Database Connection

Step 7: Now give the data source name in the appropriate box. Similarly give the database name, ip address of the database server (may be localhost or other private IP address ),then Give the User Name and Password of the database in the appropriate box.

Step 8: Press the TEST button to check the connection, whether you put all the parameters correctly or not. If everything is OK then it will give you a successful message.

Friday, July 22, 2022

How to Upload a New Module in Drupal Content Management System ?

 Q. How to Upload a New Module in Drupal Content Management System ?

Ans: Go to the Module tab and check the Update Manager and save it. Otherwise you can't upload new modules in drupal CMS. 

Drupal CMS


Tuesday, April 26, 2022

Free software for Monitoring Network Performance - MRTG [Multi Router Traffic Grapher]

 MRTG [Multi Router Traffic Grapher]  is a Free Software for Monitoring Network Performance in Graphical form. Here we will discuss the installation process of this free software in Linux distribution.

For Linux System ,we need to install the following software

  1. MRTG [latest version]
  2. SNMP
  3. Apache Web Server 
MRTG diagram
MRTG


How to Configure the MRTG ?

When MRTG's rpm is installed, it creates a directory called /etc/mrtg.
To create a replacement, default /etc/mrtg/mrtg.cfg configuration file for server , follow these steps,

1.Use MRTG's cfgmaker command to create a configuration file named mrtg.cfg for the server. Using a read only community string of craz33guy. Place all data files in the directory /var/www/mrtg.

root#cfgmaker --output=/etc/mrtg/mrtg.cfg
--global"varkdir: /var/www/mrtg" -ifref=ip
--blobal 'option[.] : growright, bits
crez33guy@localhost

NOTE :- -if ref=ip cfgmaker command option instruct MRTG to use the interface's IP address as the title for each graph.

2. Edit /etc/mrtg/mrtg.cfg, and remove the section related to interfaces you don't need to monitor. A certain candidate would be the virtual lookup interface LO: (127.0.0.1)

3. Run MRTG using /etc/mrtg/mrtg.cfg as your argument 3 times. You will get an error for 2 times, as MRTG tries to move old data files, and naturally the 1st time when it runs the MRTG , it has no data to move.

root# env LANG=C /usr/bin/mrtg /etc/mrtg/mrtg.cfg

-> give this command 3 times

4. Use MRTG's indexmaker command to create a Web index page using your new mrtg.cfg file as guide.

root# indexmaker --output=var/www/mrtg/index.html   /etc/mrtg/mrtg.cfg

5. MRTG is run every 5 minute by default, and the file that governs this is /etc/corn.d/mrtg. To work correctly edit this file, replacing all occurrence of /usr/bin/mrtg with env LANG = C /usr/bin/mrtg.


Tuesday, March 17, 2009

Password Recovery ASA 5520

Password Recovery Process for Cisco ASA 5520.

  1. Reboot Power
  2. When prompted , press Esc to interrupt the boot process and enter ROM monitor mode.You should see a Rommon Prompt (rommon#0> ).
  3. rommon#0>confreg (press enter).
  4. current configure register should be default of 0x01. Device will ask if you want to make changes to the configuration register.
    Answer : NO
  5. You must change the configuration Register to 0x41.
  6. rommon#1>confreg 0x41
  7. Reset the device.
  8. rommon#2> boot
  9. Now after booting you will see a general user mode like. ciscoasa>
  10. ciscoasa> enable password
  11. ciscoasa#
  12. ciscoasa#copy startup-config running-config
  13. ciscoasa#config t
  14. ciscoasa(config)#enable password
  15. Reset the configuration to default value 0x01.
  16. ciscoasa(config)#config-register 0x01
  17. View the configuration register setup
  18. ciscoasa#show run startup-config
  19. reload
  20. ciscoasa#reload
  21. System config has been modified,save [Yes][No]
  22. press Yes.